Today is 'My Creative Space ' day.....and I'm going to join in the fun for the first time! I'm hoping that I have the link right!

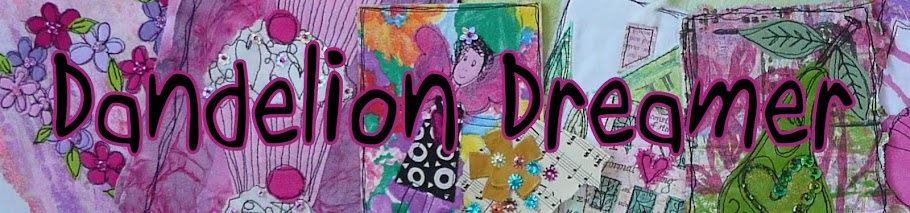
Well here I am again, still playing around with making a header for my blog....I managed to add one yesterday as you can see....it took me FOREVER to figure out how to do it...I do feel inept at times. Anyway....today I thought I'd have a few more goes to see if I can come up with something I like better.

I have an Etsy shop I opened a long time ago...(nothing in it at the moment) but I want to make a banner for it that will look similar to my Dandelion Dreamer one....

so I made a couple quickly this morning. I think I am on the right track. I thought I'd share how I'm doing it....I just wish someone else had shared this idea...!!!!! It is SO simple

Etsy Banner/Blogger Banner Tutorial by Incompetent Blogger!
A quick and easy method.....how I did it
I laid out a selection of my pieces of work overlapping each other and then took a photograph. It is a good idea to take several pictures, rearranging the pieces each time to get the result you want time…. I have left my feet in for authenticity!! Should have painted my toe nails for the event, oh well, next time!- After I'd photographed my layout, I uploaded it to Picasa (a brilliant free program from Google) and I created a custom crop in the crop department. The Etsy banner must be 76x10. This is incredibly long and shallow....this is why I'm finding it so difficult to get it right!
- The Blogger banner needs to be 5.5x23.5. Add both the crop settings to your ‘custom crops’ so you can quickly make more crops
- Click on the 'text' button and add your text, adding in some outline if you wish...You can click on the handle part to pull the text to any size you like and rotate too if you like. You can even customize the colours to colours in your picture by clicking on the ‘dropper’ and selecting a colour from it. I clicked on a pink from my picture for the outline of the text
- Job done! Simply upload the picture to a file on your computer then you can access it from Blogger or Etsy. I haven’t looked into 'Folksy' yet, but you could use the same process.
- I hope you have found this useful. Please let me see yours if you have been inspired to try this method!

And here is an update on Rosie and her 'pawly' foot. She is smilng now as you can see, so tomorrow I shall be taking her on our lovely long walk, down by the stream and under the conker trees which are hanging with thousands of gorgeous conkers. They are almost ready.......can't wait!
6 comments:
It looks lovely!
I love all your artwork - it's stunning!
Thank you Moira, I will definitely be trying to change my banner header now. I love what you have done.
Great to see Rosie is getting better.
Thanks for the tutorial. I haven't used Picasa yet but I like that you can save custom crops. Your banner turned out very nice.
so Sweet!
This is awesome Moira!! Thanks so much for sharing how you make your own banner!! I am also happy to know that rosie is feeling much better! Have a lovely merry happy weekend and love to yoU!
I love it!!
Post a Comment